Ever felt overwhelmed by the clutter of visual formatting tools and toolbars in traditional word processors? Tired of constantly switching between editing and preview modes just to see how your document will look? If you're a writer, developer, or anyone who values a distraction-free writing experience, MarkText might just be the one you've been waiting for.
In this tutorial, we will discuss what a Markdown editor is, and how to install and use the MarkText Markdown editor on Linux systems.
Table of Contents
What is Markdown Editor?
A markdown editor is a software program designed to allow users to write and edit text using markdown language.
Markdown is a simple markup language that uses plain text with a few non-alphabetic characters like #, *, -, etc. to format text. For example, surrounding text with # symbols creates headings, * creates bullet points, and ** or __ makes text bold.
A markdown editor provides a user interface to enter and modify markdown-formatted text. As the user types, the editor renders a preview of how the formatted text will look.
Key features of a typical markdown editor include:
- A text editor pane to write and edit markdown syntax
- A preview pane to see the rendered formatting like headings, lists, links, etc.
- Synchronized live preview that updates the formatting as you type
- Support for core markdown elements like headings, emphasis, links, images, etc.
- Extensions for additional markdown functionality like tables, footnotes, diagrams
- Export options to save the formatted content as HTML, PDF, or other file formats
Markdown editors make it easier to write content using the simple markdown syntax, without getting distracted by visual formatting tools. They are popular among writers, developers, and anyone who needs to create formatted content but prefers a plain text workflow.
So in essence, a markdown editor provides a dedicated environment to efficiently write and preview content authored in the markdown markup language.
What is MarkText?
MarkText is a free and open-source markdown editor that offers a distraction-free writing experience. It is designed with simplicity, speed, and usability in mind.
It offers features like live preview, syntax highlighting, support for various Markdown extensions, and the ability to export documents to HTML, PDF, and other formats.
MarkText is available for Linux, macOS and Windows platforms.
Key Features
MarkText aims to provide a simple and efficient markdown writing experience while offering features that enhance productivity and workflow.
Here are some key features about MarkText:
- Live Preview: MarkText instantly provides a live preview of your markdown content as you type, so you can see how your text will look when rendered.
- Syntax Highlighting: It supports syntax highlighting for various programming languages, making it useful for writing code snippets within your markdown documents.
- Efficient Editing Modes: MarkText supports three editing modes when writing markdown files.
- Source Code Mode: Ideal for those who prefer to work directly with markdown syntax.
- Typewriter Mode: Simulates a typewriter experience, focusing on the current line.
- Focus Mode: Hides the preview pane and other UI elements, allowing you to concentrate solely on writing.
- Image Pasting: You can paste images directly from the clipboard.
- Outline View: It generates an outline view of your document based on the headings, making it easier to navigate through long documents.
- Customizable Themes: MarkText comes with several built-in themes (Cadmium, Dark, Ulysses etc.), and you can also create your own custom themes by modifying CSS files.
- Markdown Extensions: It supports various markdown extensions, such as footnotes, Math equations (KaTeX), and front matter (YAML/TOML).
- File Management: MarkText allows you to create, open, and save markdown files directly within the application.
- GitHub Flavored Markdown: MarkText supports GitHub Flavored Markdown, which is a widely-used extension of the standard markdown syntax.
- Export Options: You can export your markdown documents to HTML and PDF formats.
- Cross-Platform: MarkText works on Linux, macOS and Windows. This makes it a good choice for users with different operating systems.
Install MarkText in Linux
MarkText is available as an AppImage format and a flatpak format. You can pick any file format of your choice and install it as shown below.
If you prefer AppImage file, follow these steps:
Install MarkText AppImage
Download the AppImage file
Visit the official MarkText website. Scroll down to the "Download" section and download the latest MarkText AppImage file for Linux. You can also get the AppImage from the MarkText GitHub releases page too.
As of writing this guide, the latest version was 0.17.1.
$ wget https://github.com/marktext/marktext/releases/download/v0.17.1/marktext-x86_64.AppImage
Make the AppImage executable
Open a terminal and navigate to the directory where you downloaded the AppImage file and run the following command to make the file executable:
$ chmod +x marktext-x86_64.AppImage
Run the AppImage
In the terminal, while in the same directory as the AppImage file, run:
$ ./marktext-x86_64.AppImage
This will launch MarkText.
Alternatively, you can integrate the AppImage with your system:
Move the AppImage to a desired location
Move the AppImage file to a directory of your choice, e.g., /opt/:
$ sudo mv marktext-x86_64.AppImage /opt/
Create a desktop entry
Run the following command to create a desktop entry for MarkText:
$ desktop-file-install /opt/marktext-x86_64.AppImage
You should now be able to find MarkText in your desktop environment's application menu.
Optional: Create a symbolic link
For easier command-line access, you can create a symbolic link to the AppImage:
$ sudo ln -s /opt/marktext-x86_64.AppImage /usr/local/bin/marktext
Now, you can run MarkText from any directory by typing marktext in the terminal.
Install MarkText from Flathub
To install MarkText from Flathub, follow these steps:
Enable Flatpak on your system
If you haven't used Flatpak before, you'll need to set it up first. Refer to our Flatpak installation guide given below.
Add the Flathub repository
Open a terminal and run the following command to add the Flathub repository:
$ flatpak remote-add --if-not-exists flathub https://flathub.org/repo/flathub.flatpakrepo
Install MarkText from Flathub
After adding the Flathub repository, you can install MarkText by running:
$ flatpak install flathub com.github.marktext.marktext
Launch MarkText
Once installed, you can launch MarkText from your desktop environment's application menu or by running:
$ flatpak run com.github.marktext.marktext
How to use MarkText Markdown Editor
Launch MarkText editor from your Application launcher or Menu.
The default interface of MarkText will look like below.
As you can see, the interface of MarkText is very simple.
Changing MarkText Theme
By default, MarkText uses the Cadmium Light theme. If you don't prefer the light theme, you can switch to any other available themes as listed below:
- Dark,
- Graphite Light,
- Material Dark,
- One Dark,
- Ulysses Light.
To change the theme, click the Hamburger icon (three horizontal lines) on the top left corner, and navigate to Theme -> Theme_name.
I prefer dark theme over the light, so I chose Dark as my preferred theme.
Writing Markdown Documents
Composing documents with MarkText editor in markdown format is quite simple.
When you first open MarkText, you'll see an empty editor window.
To get started, simply begin typing your text. MarkText will automatically hide any unnecessary syntax elements, giving you a clean writing experience.
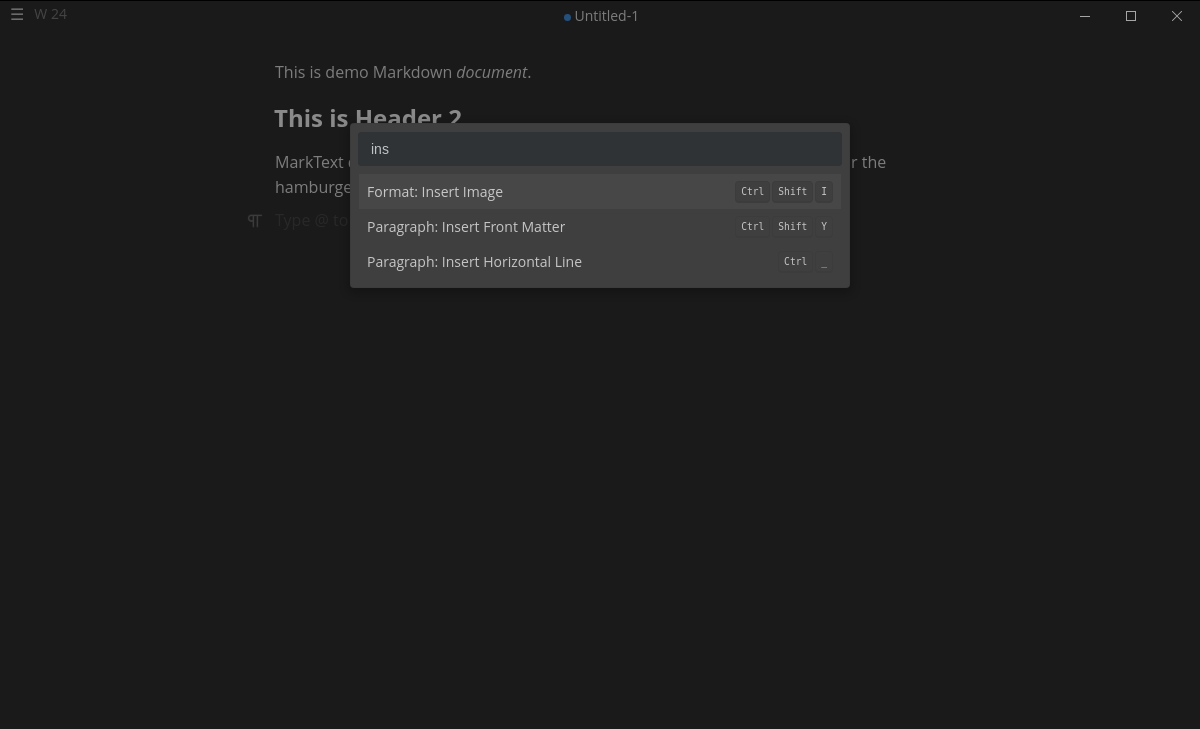
If you need to format your text or access specific features, you can use keyboard shortcuts or the command palette by pressing Ctrl+Shift+P.
You don't even need to remember any markdown syntax. You can simply type '@' to display an overlay with available text formatting options. This overlay will show you the different elements and styles you can apply to your text using markdown syntax.
As you see in the screenshot, MarkText present you the list of available blocks. You can insert a block of your choice by clicking on the respective block.
For instance, let us say you want to insert a Header block. Type @ symbol and scroll down to the Header block section and choose the type of the header (E.g. H1, H2, H3 etc,.).
Similarly, you can choose the other available blocks as you further compose the document.
Selecting Text
When you select text, a format overlay will automatically appear, allowing you to easily transform the selected text or apply inline markdown formatting.
The format overlay provides options such as:
- Bold
- Italics
- Underline
- Strikethrough
- Inline code
- Inline math formulas
- Create links
- Insert images
- Remove formatting
Additionally, further overlays are available for inserting emojis, formatting links, adjusting image settings, and creating tables.
Alternatively, you can use keyboard shortcuts or the command palette (accessed by pressing Ctrl+Shift+P) to access various formatting and editing commands.
Create New Files
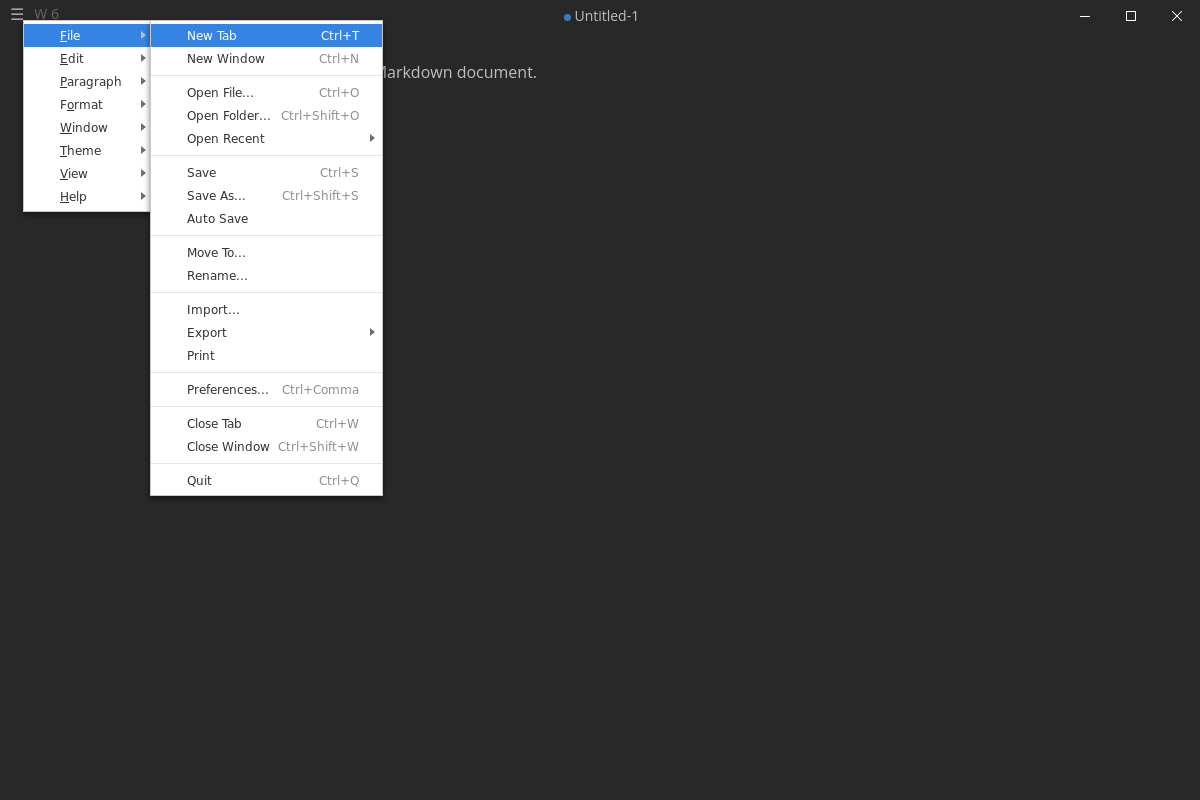
To create a new file, go to menu File > New Tab (Ctrl+T) or File > New Window (Ctrl+N).
Open Existing Files
You can use the menu File -> Open File or press Ctrl+O to open a file dialog and choose a Markdown file. Alternatively, you can launch MarkText with directories or files via the command line.
Save Edited File
After making modifications, you can save your file using Ctrl+S, or use the "Save As" option to save the file with a different name.
Open a Directory
MarkText also supports opening an entire directory using Ctrl+Shift+O, or by clicking the "File -> Open Folder" button in the menu bar.
After opening a directory, all files and subdirectories are displayed in the sidebar's tree view. The tree view allows you to:
- Open additional files
- Browse and modify files or directories within the opened root directory
Above the tree view, you'll find all the currently opened files. You can also use the "Command Palette" feature (Ctrl+P) to quickly open a file from the opened root directory or the current editor. Navigate through the results using the arrow keys or select a file with your mouse.
To view other sidebar panels, like "Find in Files," click on the respective icons in the left sidebar.
Insert Images
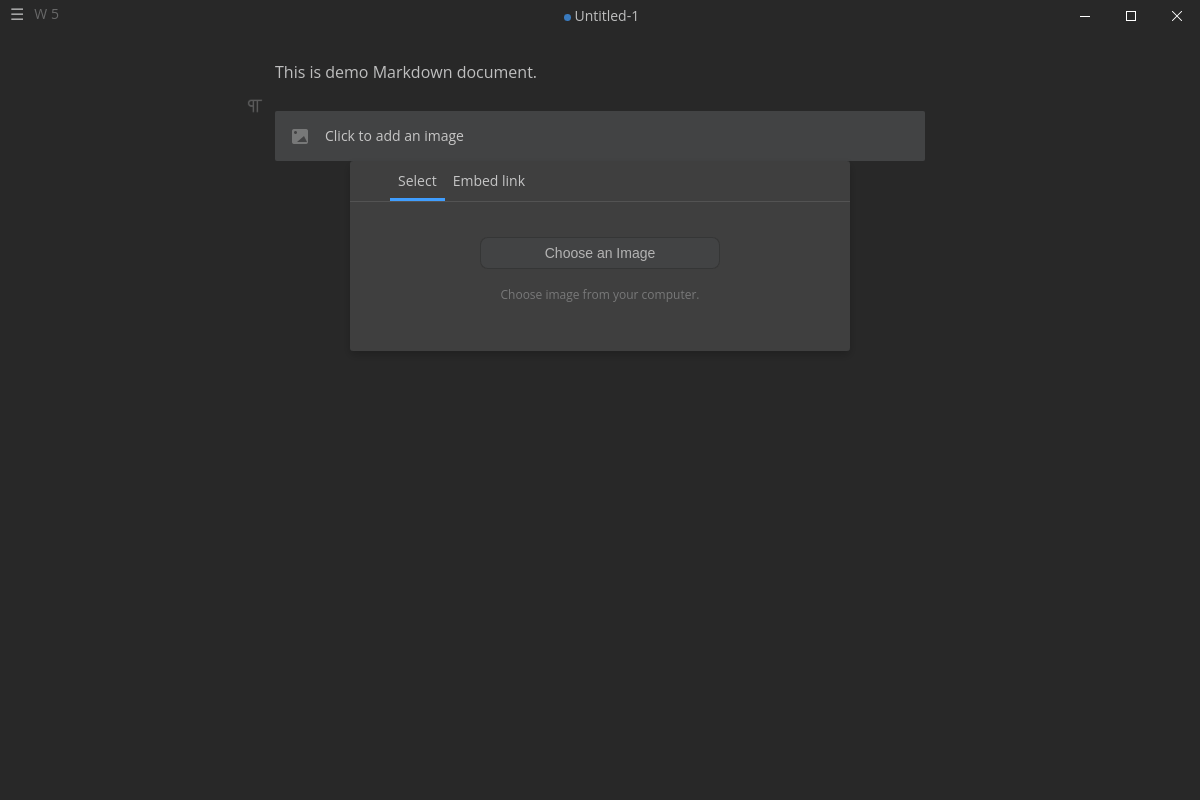
You can insert an image by navigating to File -> Format -> Image or by pressing Ctrl+Shift+I. You can either choose an image from the local file system or provide the image path to embed it in your markdown document.
It is also possible to directly paste the image from your clipboard.
Once the image is inserted, align it (left, right or center) as you wish using the image overlay pop-up.
Get Things Done Faster with Command Palette
MarkText comes with a powerful feature known as the Command Palette. This nifty tool allows you to perform actions swiftly by typing commands directly.
Here's how MarkText's Command Palette works:
1. Accessing Command Palette:
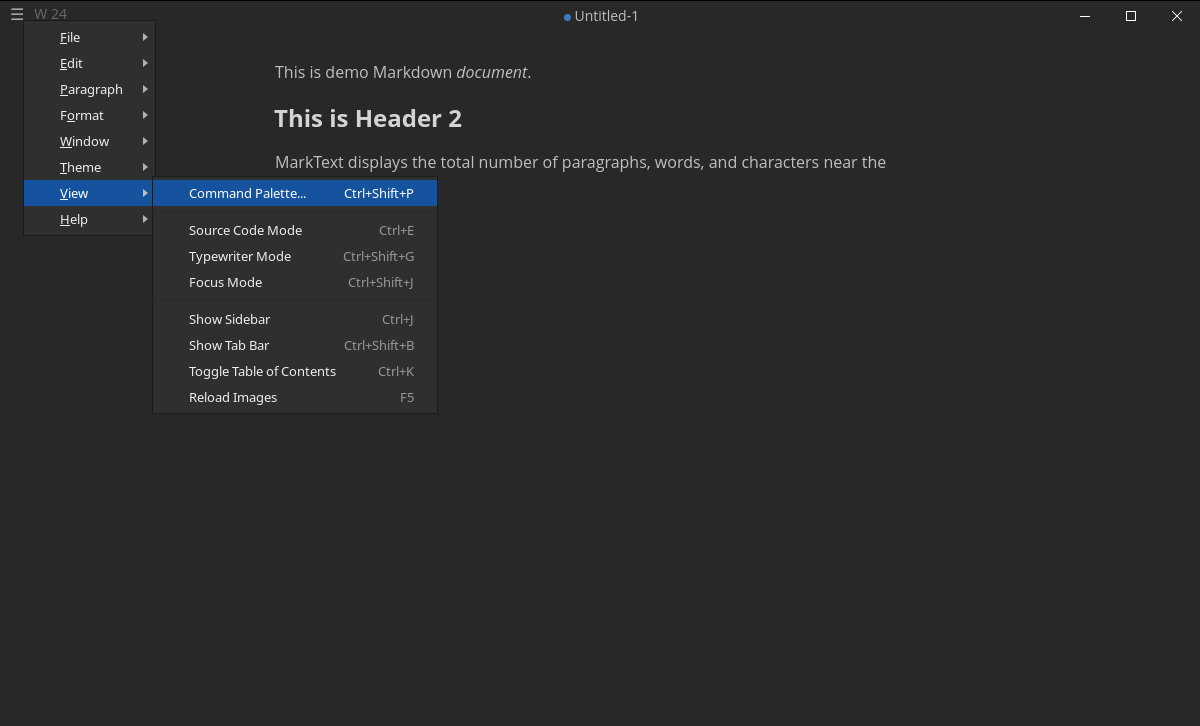
To access the Command Palette, press a keyboard shortcut Ctrl+Shift+P. Alternatively, navigate to the File -> View and select "Command Palette".
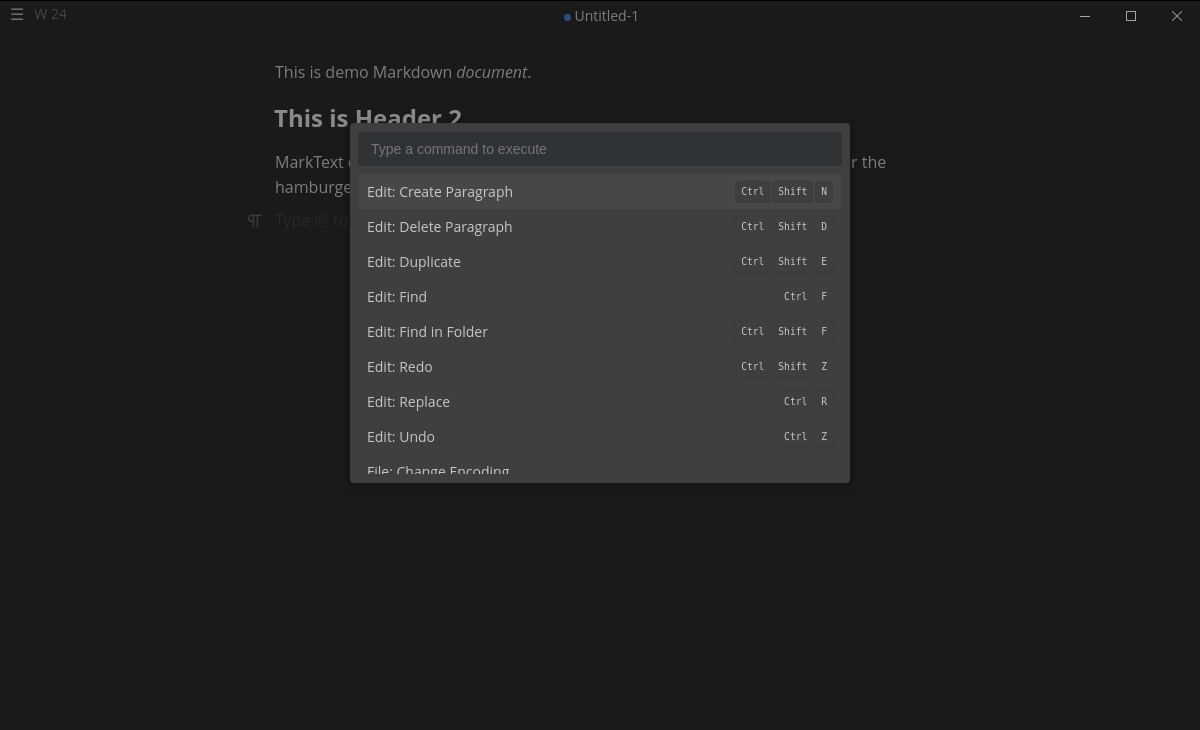
This is how the Command Palette looks like.
2. Command Input:
Once the palette is open, start typing your desired command. MarkText will instantly display relevant options based on your input.
3. Executing Actions:
Select the desired action from the list. MarkText will execute it immediately, saving you time and clicks.
The Command Palette covers a wide range of tasks, including:
- Inserting special characters,
- Applying formatting,
- Managing extensions,
- Customizing settings,
- And much more.
Changing Block Styles
You can transform any line into another type instantly without using the menu bar or shortcut keys.
If you do not want the current block style and wish to change the type of a block to other (E.g. transform Header into Paragraph), simply click on the respective block icon, click "Turn Into" and choose the other block style.
Of course, you can perform all actions from the menu bar as well. However, selecting and inserting different block styles directly from the editor pane itself is the fastest method.
Viewing Paragraph, Word or Character Count
MarkText displays the total number of paragraphs, words, and characters near the hamburger menu.
Showing the word and character count is a common feature in writing and text editing applications. It allows writers to easily track the length of their document.
MarkText makes it easily accessible with a quick glance. Writers can keep track of these metrics without having to navigate through menus or separate windows.
Working with Different Editing Modes
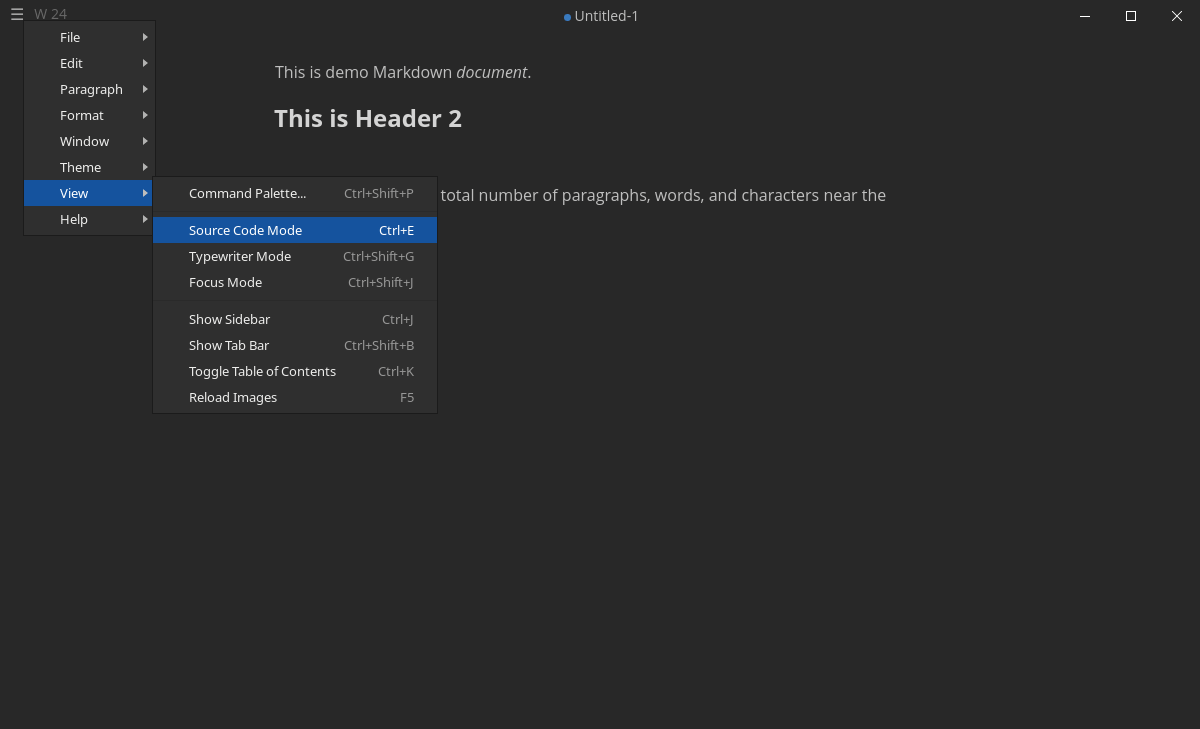
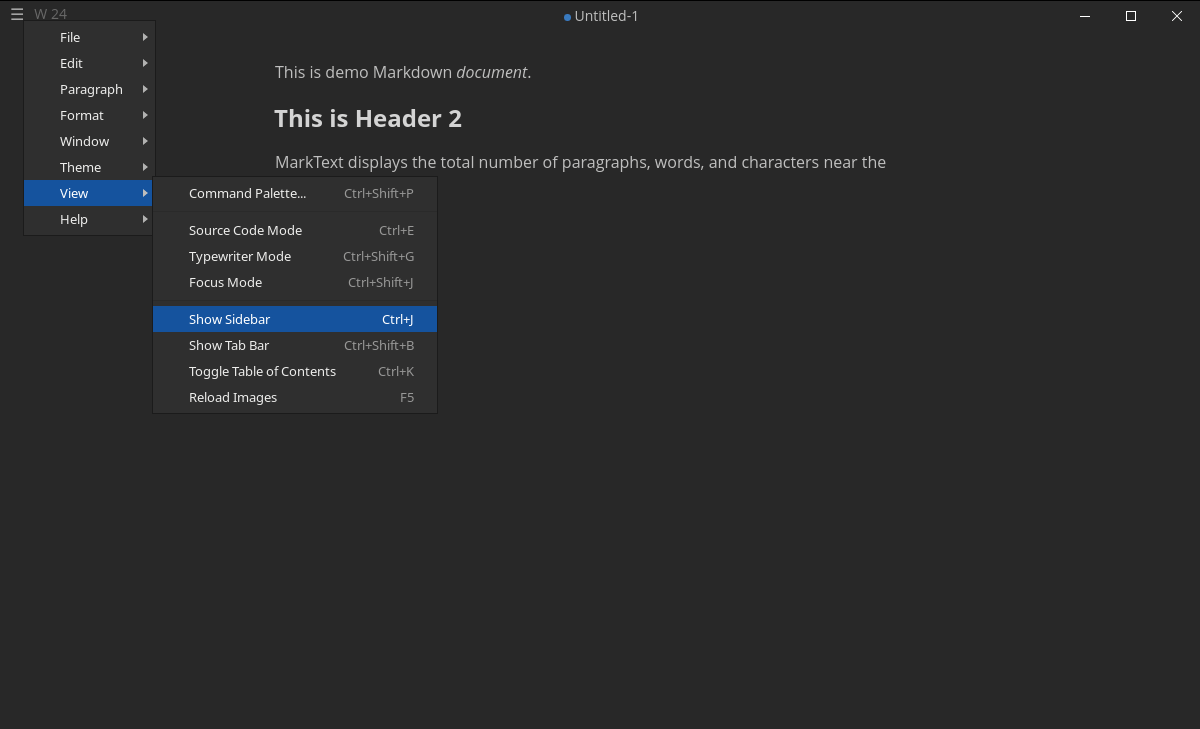
MarkText provides three distinct editing modes for users to choose from. They are Source Code mode, Typewriter mode and Focus mode.
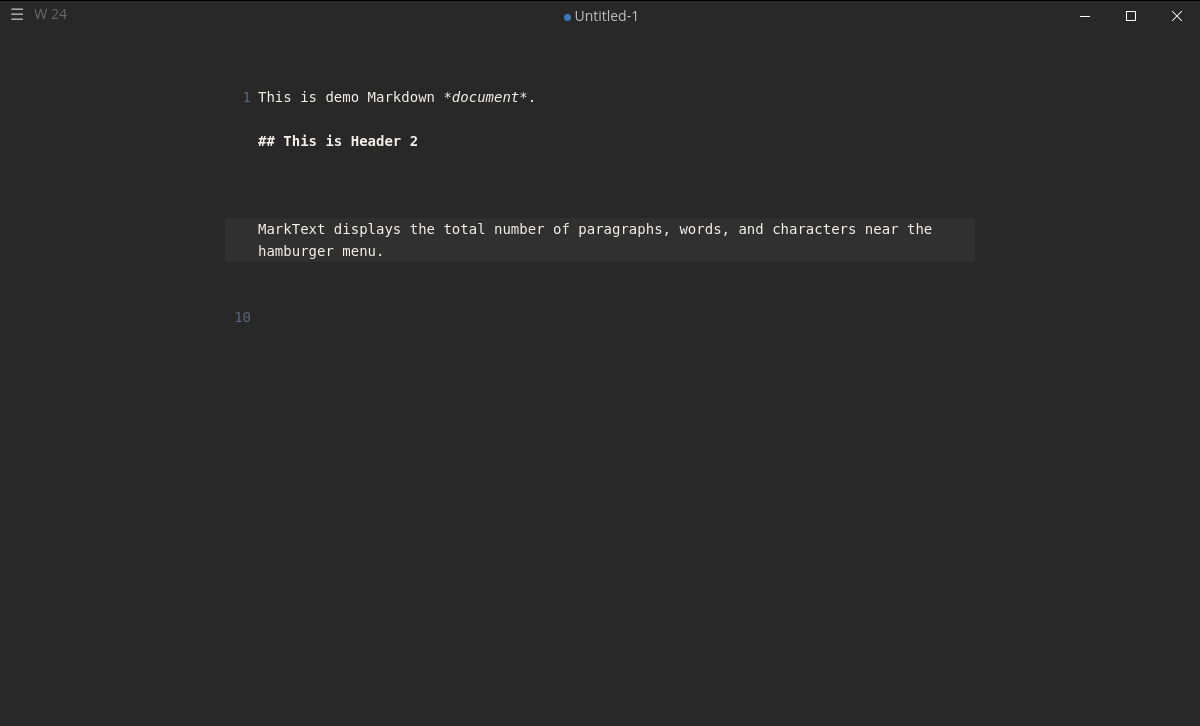
Source Code Mode:
This mode is for those who are comfortable working directly with Markdown code. It displays the raw Markdown text, allowing users to edit and format their content manually.
If you enjoy the precision and control of writing Markdown directly, this mode is ideal.
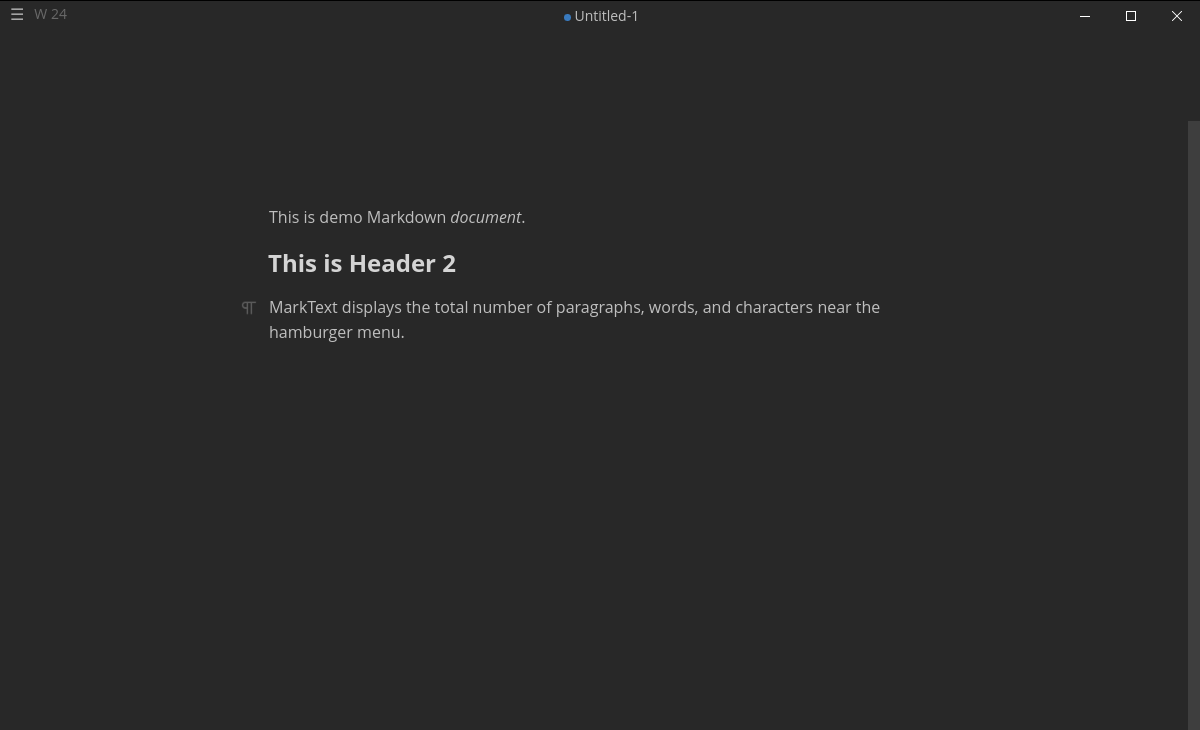
Typewriter Mode:
In this mode, MarkText mimics the experience of typing on a typewriter. The cursor remains centered vertically on the screen, similar to how a typewriter carriage moves.
As you can see here in the screenshot, the content is displayed in the center of the editor pane, as you would see in a typewriter.
This mode can evoke a sense of nostalgia and focus, especially for writers who appreciate the simplicity of typewriters.
Focus Mode:
Focus mode minimizes distractions by highlighting only the current line or paragraph where you're actively typing. The rest of the content fades into the background, allowing you to concentrate on your writing without visual clutter.
As you see in the screenshot, the first two blocks are faded and the last active block is highlighted. It's excellent for maintaining flow and staying immersed in your work.
Each mode serves a specific purpose, and users can choose the one that aligns with their workflow and personal preferences. Whether you prefer the immediacy of WYSIWYG (real-time preview), the nostalgia of typewriters, or the focused simplicity of single-line editing, MarkText has you covered!
Showing Sidebar and Tab Bar
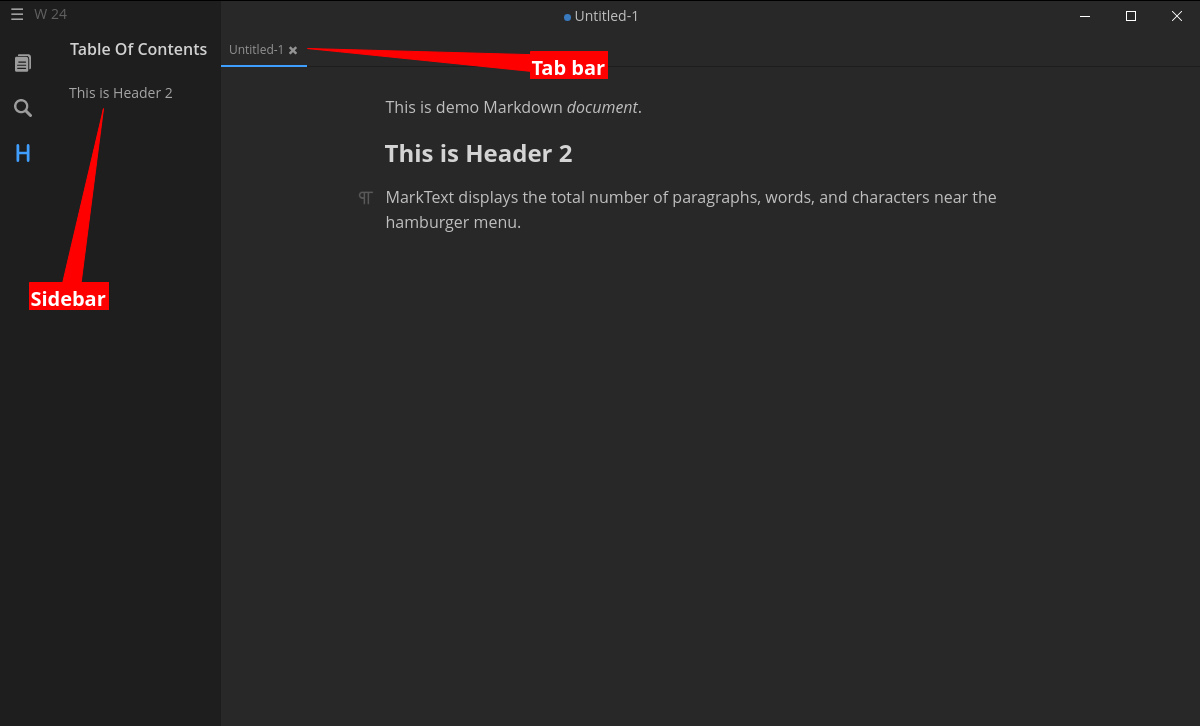
To display Sidebar and Tab bar in MarkText, go to File -> Sidebar or File -> Tab Bar.
By providing both the Sidebar and Tab bar, MarkText aims to enhance productivity and workflow for users who prefer a more organized and efficient writing environment.
MarkText's sidebar is comprised of three panels, which can be toggled by pressing Ctrl+J. These panels include:
- A filesystem explorer providing a tree view of the opened root directory, allowing easy navigation through your files and folders.
- A "Find in Files" functionality to search for specific text across multiple files within the opened directory.
- A table of contents panel that displays an outline view of the currently selected document tab, enabling quick navigation to different sections.
The sidebar and tab bar in MarkText serves a few important purposes:
Sidebar:
- File Navigation: The sidebar displays the file structure and allows you to easily navigate between different files and folders within your project or workspace.
- Outline View: It provides an outline view of the current document, showing all the headings and their hierarchy. This makes it easier to jump to specific sections of a long document.
- Quick File Access: The sidebar allows you to quickly open and switch between frequently used or recently accessed files.
Tab Bar:
- Multiple Document Management: MarkText supports working with multiple documents simultaneously, and the tab bar displays all the open files as tabs, similar to web browsers or code editors.
- Easy Document Switching: With the tab bar, you can quickly switch between different open documents by clicking on their respective tabs, without having to go through menus or separate windows.
- Document Overview: The tab bar gives you an at-a-glance overview of all the documents you have open, helping you manage and organize your workspace more efficiently.
In summary, the sidebar allows for better file and project management, while the tab bar facilitates seamless switching between multiple open documents.
Export Documents
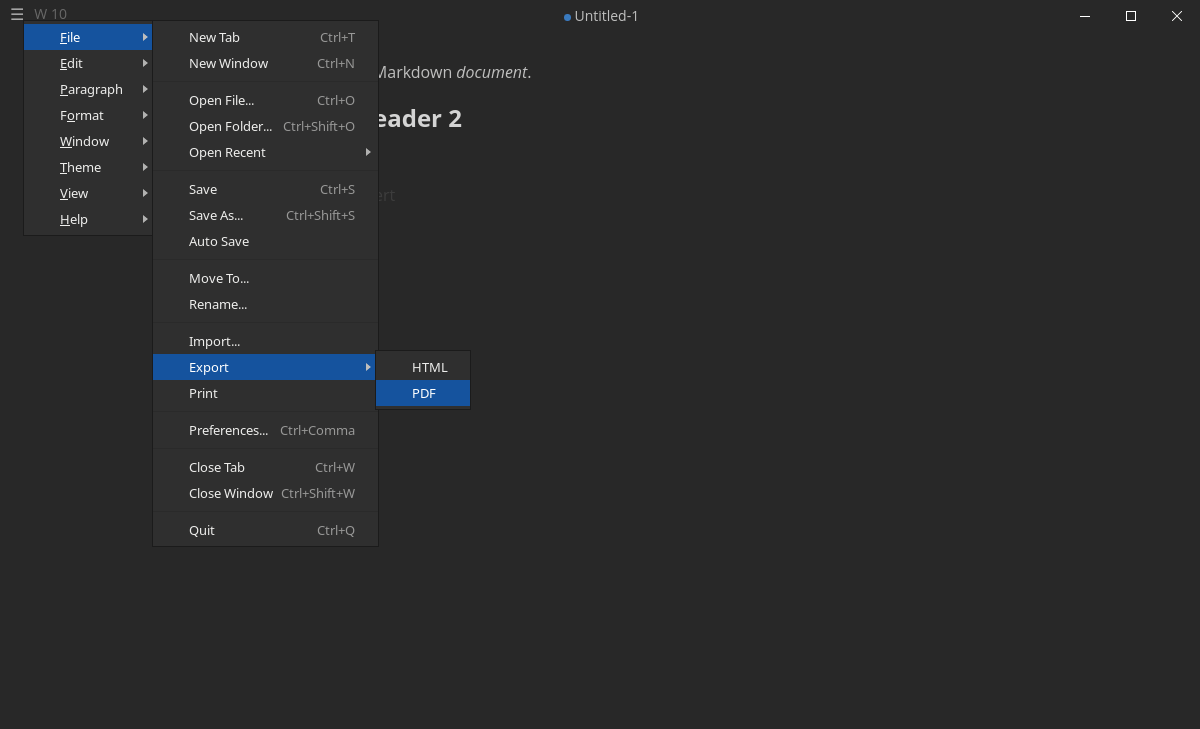
Once you've finished writing, you can export your document to various formats like HTML, or PDF formats. Go to File -> Export from the Hamburger menu and choose the output format type.
Preferences
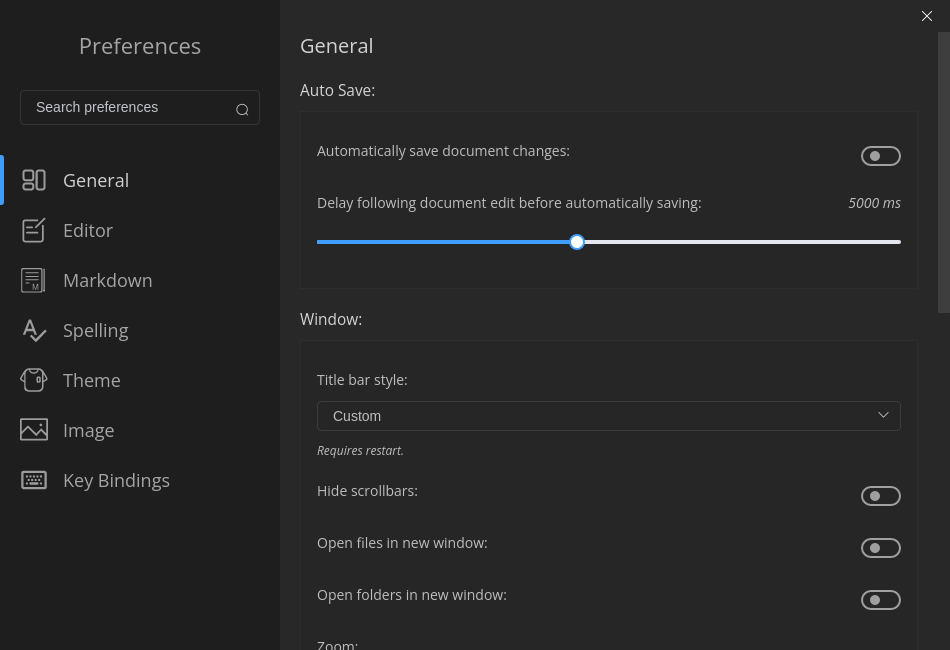
The Preferences section provides a centralized location for fine-tuning MarkText's capabilities, allowing you to mold the application to align with your specific writing requirements and personal preferences.
To open the Preferences section, navigate to File -> Preferences.
From the Preferences section of MarkText, you can customize various settings to tailor the application to your needs:
- General application settings: Adjust global preferences that control the overall behavior and functionality of MarkText.
- Editor appearance settings: Modify the visual aspects of the text editor, such as font styles, color schemes, and layout options, to create a personalized writing environment.
- Markdown-related settings: Configure how MarkText handles and renders Markdown syntax, including options for extensions, formatting preferences, and compatibility modes.
- Application theme: Choose from a range of built-in themes or explore custom themes to change the overall aesthetic of MarkText's user interface.
- Image handling options: Specify how MarkText should manage and display images within your Markdown documents, such as setting default folder locations or enabling image uploads.
MarkText Keyboard Shortcuts
MarkText provides numerous keyboard shortcuts to help you write and format your content efficiently. For example, Ctrl+B for bold, Ctrl+I for italics, Ctrl+L for links, and many more.
Here are the MarkText keyboard shortcuts.
| Shortcut | Description |
|---|---|
| Ctrl+Shift+N | Edit: Create Paragraph |
| Ctrl+Shift+D | Edit: Delete Paragraph |
| Ctrl+Shift+E | Edit: Duplicate |
| Ctrl+F | Edit: Find |
| Ctrl+Shift+F | Edit: Find in Folder |
| Ctrl+Shift+Z | Edit: Redo |
| Ctrl+R | Edit: Replace |
| Ctrl+Z | Edit: Undo |
| Ctrl+W | File: Close current Tab |
| Ctrl+Shift+W | File: Close Window |
| Ctrl+T | File: New Tab |
| Ctrl+N | File: New Window |
| Ctrl+O | File: Open file |
| Ctrl+Shift+O | File: Open Folder |
| Ctrl+P | File: Quick Open |
| Ctrl+S | File: Save |
| Ctrl+Shift+S | File: Save As… |
| Ctrl+Shift+R | Format: Clear Format |
| Ctrl+I | Format: Emphasis |
| Ctrl+Shift+H | Format: Highlight |
| Ctrl+L | Format: Hyperlink |
| Ctrl+Y | Format: Inline Code |
| Ctrl+Shift+M | Format: Inline Math |
| Ctrl+Shift+I | Format: Insert Image |
| Ctrl+D | Format: Strike |
| Ctrl+B | Format: Strong |
| Ctrl+U | Format: Underline |
| Ctrl+, | MarkText: Preferences |
| Ctrl+Q | MarkText: Quit |
| Ctrl+Shift+Tab | Misc: Cycle Tabs Backward |
| Ctrl+Tab | Misc: Cycle Tabs Forward |
| Ctrl+Shift+L | Paragraph: Convert to Loose List Item |
| Ctrl+Shift+0 | Paragraph: Create new Paragraph |
| Ctrl+Shift+T | Paragraph: Create Table |
| Ctrl+- | Paragraph: Degrade Heading |
| Ctrl+Shift+Y | Paragraph: Insert Front Matter |
| Ctrl+_ | Paragraph: Insert Horizontal Line |
| Ctrl+H | Paragraph: Transform into Bullet List |
| Ctrl+Shift+K | Paragraph: Transform into Code Fence |
| Ctrl+Alt+1 | Paragraph: Transform into Heading 1 |
| Ctrl+Alt+2 | Paragraph: Transform into Heading 2 |
| Ctrl+Alt+3 | Paragraph: Transform into Heading 3 |
| Ctrl+Alt+4 | Paragraph: Transform into Heading 4 |
| Ctrl+Alt+5 | Paragraph: Transform into Heading 5 |
| Ctrl+Alt+6 | Paragraph: Transform into Heading 6 |
| Ctrl+Alt+H | Paragraph: Transform into HTML Block |
| Ctrl+Alt+M | Paragraph: Transform into Math Formula |
| Ctrl+G | Paragraph: Transform into Order List |
| Ctrl+Shift+Q | Paragraph: Transform into Quote Block |
| Ctrl+Shift+X | Paragraph: Transform into Task List |
| Ctrl+Plus | Paragraph: Upgrade Heading |
| Ctrl+Shift+J | View: Focus Mode |
| Ctrl+J | View: Toggle Sidebar |
| Ctrl+E | View: Toggle Source Code Mode |
| Ctrl+Shift+B | View: Toggle Tabs |
| Ctrl+Shift+G | View: Toggle Typewriter Mode |
| Ctrl+M | Window: Minimize |
| F11 | Window: Toggle Full Screen |
| Ctrl+Scroll | Window: Zoom… |
Frequently Asked Questions
Here's a FAQ (Frequently Asked Questions) for MarkText:
A: MarkText is an open-source, free markdown editor available for Windows, macOS, and Linux platforms. It provides a distraction-free writing environment with live preview capabilities for markdown files.
A: MarkText offers a clean and minimalist interface, allowing you to focus on writing without distractions. It supports various markdown extensions, syntax highlighting, and the ability to export documents to multiple formats (HTML, PDF). Its real-time live preview makes it easy to see how your formatted text will appear.
A: Yes, MarkText features a live preview pane that automatically updates as you type in the editor, allowing you to see the formatted output in real-time.
A: MarkText supports various markdown extensions, including tables, footnotes, math equations (KaTeX), front matter (YAML/TOML), and GitHub Flavored Markdown.
A: Yes, MarkText offers several built-in themes, and you can also create your own custom themes by modifying CSS files.
A: Yes, MarkText provides numerous keyboard shortcuts for various actions, such as formatting text, navigating documents, and managing files. You can find the full list of keyboard shortcuts in the application's help or preferences menu.
A: Yes, MarkText allows you to export your markdown documents to various formats, including HTML, and PDF documents.
A: MarkText itself does not have built-in version control or collaboration features. However, you can use it in conjunction with version control systems like Git or online collaboration tools by managing your markdown files accordingly.
A: MarkText does not have a built-in sync or backup feature. However, you can manually back up your MarkText settings and documents by copying the relevant files and folders to a safe location.
Conclusion
Whether you're a developer working on documentation, a writer trying to stay focused on that novel draft, or just someone who appreciates the simplicity of markdown, MarkText is worth checking out.
This article itself was composed using MarkText, so I can confidently say that this is a fantastic markdown editor. Give it a try, and you'll definitely love it.
Resource:
Related Read:


