
Nginx Proxy Manager (NPM) is an easy-to-use tool for managing reverse proxy configurations. Essentially, it acts as a user-friendly interface for the high-performance Nginx web server and also uses Let’s Encrypt in the background to issue free SSL certificates, thus providing HTTPS connectivity to proxied services.
Compared to other reverse proxy solutions like Nginx, Caddy, or Traefik, the main NPM’s appeal lies in its ability to provide a convenient graphical user interface for managing proxy settings, SSL/TLS certificates, and access controls, making it accessible even to those with minimal command-line experience.
However, if you want to try other reverse proxy options, you can count on our easy-to-follow guides for Nginx and Caddy. Now, back to the topic. Here are the main selling points of Nginx Proxy Manager.
Why Use NPM as a Reverse Proxy?
Using Nginx Proxy Manager as a reverse proxy can provide several advantages:
- Easy-to-Use: Even if you’re not very technical, you can set up a fully functional reverse proxy in just 20-30 minutes.
- Security: It can hide the characteristics and details of backend servers, offering an additional layer of security.
- Load Balancing: NPM can distribute traffic across multiple servers, enhancing the performance and reliability of web applications.
- SSL Management: Automatic and easy SSL setup and renewal processes for encrypted traffic, improving website security with HTTPS.
Explaining Our Setup
NPM runs in a Docker container. Because of this, ensure you have a server with Docker installed. But don’t worry if you don’t have it yet; we’ve got you covered. Our guides on how to install Docker on almost all major Linux distributions, such as Ubuntu, Debian, Fedora, Linux Mint, Pop!_OS, Alma, and Rocky Linux, will walk you through the steps with ease.
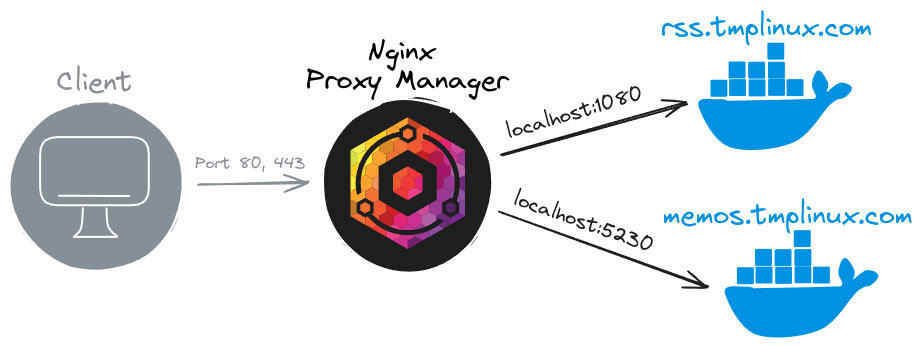
Next, let’s clarify our setup. On our server, we have two containerized sample applications to which we will proxy the traffic: the FreshRSS reader and the Memos note-taking app, which run on ports 1080 and 5230, respectively.
Of course, you might be working with many more. Nginx Proxy Manager can manage such heavy loads without any issues. We’ve opted for just two applications to keep things as simple and clear as possible.
Furthermore, we’re using “tmplinux.com,” a domain we own and use for tests. We’ll direct two subdomain DNS A records, “rss.tmplinux.com” for the FreshRSS app and “memos.tmplinux.com” for the Memos note-taking app, to the server public’s IP address Nginx Proxy Manager runs on.
Here’s our production process to give you a better visual understanding.
However, if you don’t have your own domain, you can always set a static entry for an arbitrary one in your “/etc/hosts” file. Our detailed guide explains everything if you need to learn how to do this.
But keep in mind that if you take this approach, you won’t be able to get a valid SSL certificate from NPM because you need to own a domain name and link it to a real public IP address to do that.
Now that everything is clear, let’s get straight to the point: setting up Nginx Proxy Manager to handle reverse proxy tasks.
Install Nginx Proxy Manager
Before installing NPM, we must first set up a new Docker network. This network will connect NPM to any other containers it needs to interact with. If we don’t do this, the Nginx Proxy Manager won’t be able to interact with these containers and send traffic to them.
Let’s create our Docker network by choosing “reverse_proxy” as a name.
docker network create reverse_proxyCode language: Bash (bash)Next, we’ll verify that everything is in order and the network is available.
docker network lsCode language: Bash (bash)
With the “reverse_proxy” Docker network created, let’s proceed with the installation of the Nginx Proxy Manager itself. As a first step, create a directory “npm” and enter it.
mkdir npm
cd npmCode language: Bash (bash)
We’ll be deploying NPM using Docker Compose. Open your text editor and create a “docker-compose.yaml“ file. Paste the content provided below, save it, and exit.
nano docker-compose.yamlCode language: Bash (bash)version: '3.8'
services:
app:
container_name: npm
image: 'jc21/nginx-proxy-manager:latest'
restart: unless-stopped
ports:
- '80:80' # Public HTTP Port
- '443:443' # Public HTTPS Port
- '81:81' # Admin Web Port
networks:
- reverse_proxy
volumes:
- ./data:/data
- ./letsencrypt:/etc/letsencrypt
networks:
reverse_proxy:
name: reverse_proxy
external: trueCode language: YAML (yaml)As you can see, this is a pretty simple Compose file. It’s important to note that ports 80 and 443 are where Nginx Proxy Manager will receive requests, while port 81 lets you access the NPM’s web admin interface.
Furthermore, we’re also setting up two volumes in the current directory to keep NPM configuration data and SSL certificates safe. This is crucial because, by design, Docker doesn’t save data permanently; without these volumes, any data would be lost when the container restarts.
Before we deploy NPM, let’s ensure that no other services use ports 80 and 443, which are needed for the Nginx Proxy Manager. If these ports are already in use, you’ll need to stop those services that use them. Otherwise, NPM won’t start and will show an error.
To see which ports are in use, we’ll use the netstat command and look at its output for ports 80 and 443. We’re good to go if they aren’t on the list.
netstat -tulnpCode language: Bash (bash)
Now, we’re ready to go ahead and deploy the Nginx Proxy Manager container:
docker compose up -dCode language: Bash (bash)
Linking Containers to NPM’s Docker Network
Once again, the Nginx Proxy Manager must share the same network with the containers to which it proxies requests to be able to communicate with them. This requires modifying their deployments.
For example, the adjustment made to our FreshRSS deployment involves adding a “reverse_proxy” network part, as shown below:

Ensure you restart your containers following the changes.
You can also link containers that are already running to the “reverse_proxy” network we set up earlier by using the following command:
docker network connect reverse_proxy CONTAINER_NAMECode language: Bash (bash)Or when you start them, if you use a single docker run command, connect them to the required network:
docker run --network=reverse_proxy YOUR-OTHER-OPTIONS-HERECode language: Bash (bash)Use the following command to check if the running containers share the Docker network you need.
docker ps --format "table {{.Names}}\t{{.Networks}}"Code language: Bash (bash)
Accessing the Nginx Proxy Manager Dashboard
Open your browser and go to your server’s IP address on port 81 (“http://server-ip-address:81“), where you can access the NPM admin interface. Log in using the default credentials:
- Username: [email protected]
- Password: changeme

A popup will appear asking you to update your admin account information. Enter your full name, username, and a valid email address, then click the “Save” button to confirm your changes.

A new window will open for you to update the admin password. Type “changeme” in the “Current Password” field and then choose and enter a new secure password in the following two fields. Click “Save” to apply changes.

This will take you to the user page, where you can see your admin account has been updated.

Issuance of SSL Certificate
We’re all set to issue a valid SSL certificate so our services can securely connect over HTTPS. Just ensure you have a valid (resolvable) DNS “A” record set up that points to the public IP address of the server where you just installed Nginx Proxy Manager.
You can quickly verify this with nslookup or the dig command. For example, we’re getting an SSL certificate for the host “memos.tmplinux.com.” A quick check confirms that it points to the correct IP address.

Choose “SSL Certificates” from the main menu. Then, click the “Add SSL Certificate” button to get your certificate through the Nginx Proxy Manager web interface.

From the next screen, do the following:
- In “Domain Names,” enter the domain name you want to issue a certificate.
- Enter a valid email address.
- Accept the terms of Let’s Encrypt.
- Click the “Save” button to begin getting your certificate.

NPM will quickly start working behind the scenes, and the entire process of setting up the certificate will take no more than 20-30 seconds.

The page will automatically reload, and if everything is successful, your new SSL certificate for the specified domain will appear ready.

Setting Up Reverse Proxy with Nginx Proxy Manager
We’re now at the most exciting part: setting up our reverse proxy using Nginx Proxy Manager. We’ll explore two scenarios: one where we use an SSL certificate for a secure HTTPS connection and another where we set up a reverse proxy without a certificate, using only HTTP. Let’s get started.
NPM Reverse Proxy with an SSL Certificate
Go to the main menu, choose “Hosts,” and then select “Proxy Hosts” from the submenu that appears.

On the next page, click the “Add Proxy Host” button.

This section is crucial for setting up a successful reverse proxy connection, so we’ve detailed each option below.

From the “Details” tab, in the “Domain Names” field, enter the domain name for which you want Nginx Proxy Manager to create a reverse proxy. In our case, this is the name for which we just issued an SSL certificate in the previous step, namely “memos.tmplinux.com.”
The “Scheme” section is crucial. You can choose between “http” and “https” here. This choice indicates whether the Docker container listens for HTTP or HTTPS requests. In almost all cases, Docker containers aren’t set up out-of-the-box to handle HTTPS by default, so you’ll typically want to go with “http” here.
In the “Forward Hostname/IP” box, just type in the name of the Docker service. Because we send traffic to both the NPM container and the other Docker containers to share the same Docker network, the Nginx Proxy Manager connects to them using their service names.
Not sure what the name of the service is? Take a look at the image below.

In the “Forward Port” field, type in the Docker container’s port number to receive incoming requests. Again, this is not to be confused with ports 80 and 443, on which the NPM container itself listens.
If you’re unsure about the ports, you can easily check them using the following command:
docker ps --format "table {{.Names}}\t{{.Ports}}"Code language: Bash (bash)
Just to clear things up! When you see “1080->80“, for example, it means that the Docker container is linking its own internal port 80 to port 1080 on the host computer. In other words, the Docker container port itself on which it listens is 80, not 1080.
Finally, we recommend turning on the “Block Common Exploits” option for better protection against common cyber attacks.
Now, don’t rush to click the “Save” button; instead, switch to the “SSL” tab. From the “SSL Certificate” menu, select the Let’s Encrypt certificate you issued a little while ago.

Enable these settings:
- “Force SSL“: This automatically redirects traffic from HTTP to HTTPS for secure browsing.
- “HTTP/2 Support“: The recommended HTTP protocol version used today.
- “HSTS Enabled“: This helps protect against certain malicious attacks.

Finally, click “Save” to apply your changes.

The moment of truth! Point your browser to the address you set up in NPM. Your application should be running securely over HTTPS, as indicated by the padlock icon in the address bar. What can I add other than, congratulations!

NPM Reverse Proxy without SSL
Adding a reverse proxy in NPM to a host that doesn’t use an SSL certificate is similar to the previous example, but everything you need to do is in the “Details” tab. In other words, you don’t need to touch the “SSL” tab.
We’ll add an entry for “rss.tmplinux.com,” pointing to our second Docker container. To do this how you’re used to, go to the main menu and choose “Hosts” then “Proxy Hosts “. After that, just click on the “Add Proxy Host” button.
The scheme is “http,” and the Docker service is named “freshrss.” The container uses port 80. Fill in the necessary information for your case, and apply the settings you made, confirming with the “Save” button.

Note that unlike our first host, “memos.tmplinux.com,” for which we issued and configured the use of an SSL certificate, our new address is marked as “HTTP only.”

By pointing our browser to the address, NPM proxies traffic to it over an unsecured HTTP connection only.

It is important to note that we recommend only going with this option if, for example, you’ll be using the service solely within your home network. However, if your service is accessible over the internet, set up an SSL certificate in Nginx Proxy Manager to enable secure HTTPS connections.
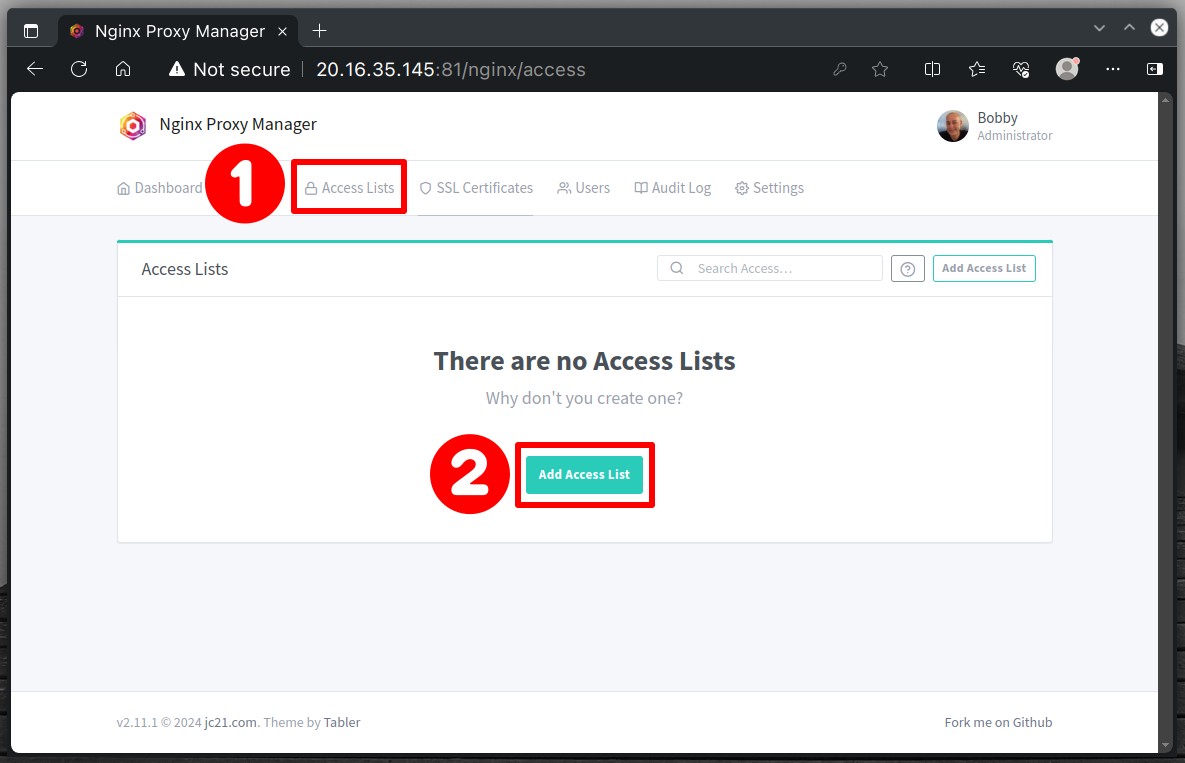
Restricting Access by IP Address in Nginx Proxy Manager
One effective way to improve security is restricting access based on IP addresses. Nginx Proxy Manager makes this process incredibly quick and simple, requiring just a few clicks. Let’s walk you through it.
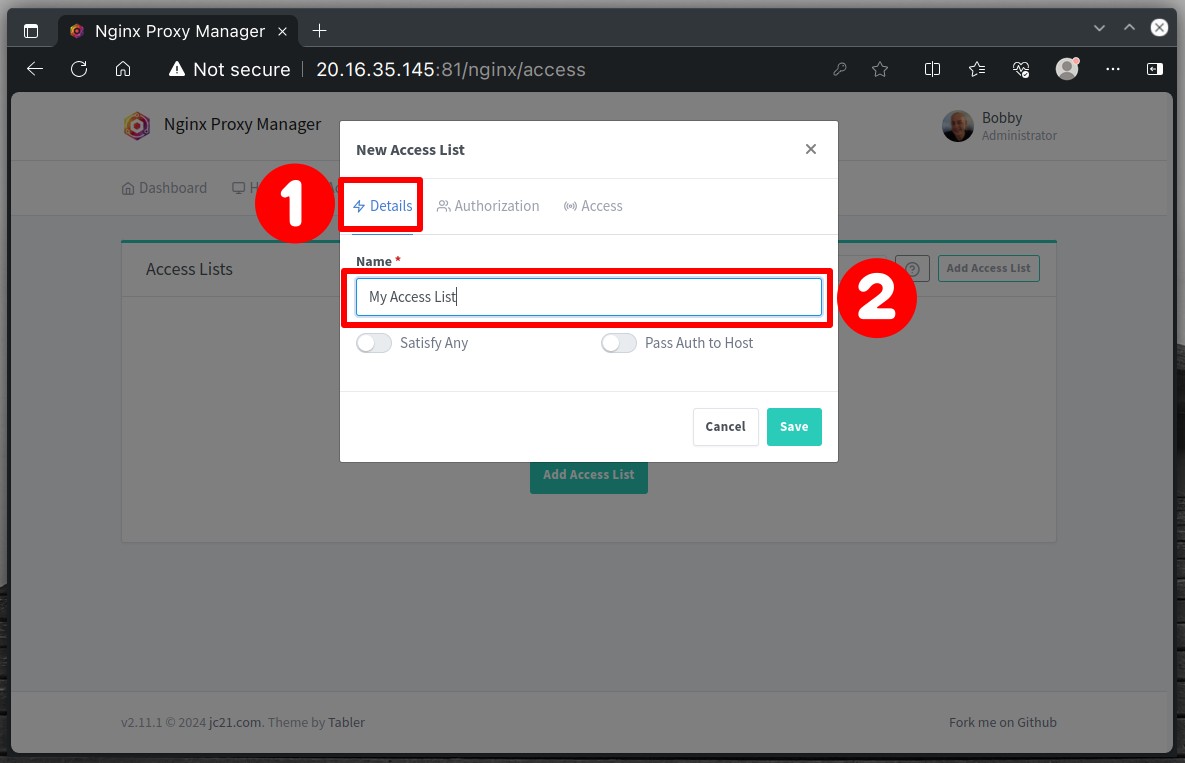
Navigate to the “Access Lists” section and click the “Add Access List” button.
A modal window will appear. In the “Details” section, specify some descriptive name of your choice.
Switch to the “Access” tab. Suppose you want to restrict access to your private home network IP range, “192.168.x.x,” and a specific public IP address, “1.2.3.4“.
Input the appropriate addresses for your situation, ensuring the final entry is a “deny” directive set to “all.” Once you have finished configuring the settings, click the “Save” button to apply the changes.

If this is your first time creating an access list, it will appear at the top of the list. If you need to make changes, don’t worry—you can easily edit it anytime by clicking the three-dot icon on the right and selecting “Edit.”

Now, let’s apply the access list to one of our hosts, “memos.tmplinux.com.” Navigate to “Hosts” -> “Proxy Hosts,” then click on the three-dot icon on the right and select “Edit.”

From the “Access List” drop-down menu, choose the recently created “My Access List” and click “Save” to confirm.

And that’s it. Now, if we try to access the service from an IP address other than the ones allowed in our “My Access List,” Nginx Proxy Manager will show the “403 Forbidden” page shown below.

Conclusion
Setting up a reverse proxy using Nginx Proxy Manager offers a robust and user-friendly solution for managing server traffic, improving security, and optimizing performance.
By providing a convenient UI, NPM makes it accessible for users, even with limited command-line experience, to configure a reliable, performant, and secure reverse proxy server.
It also efficiently simplifies the integration of SSL certificates and access controls, eliminating much of the complexity traditionally associated with setting up such a server.
For more information, we highly recommend visiting the official NPM documentation or the project’s website.
Thanks for your time! I hope you find this guide helpful. Please let me know in the comments section below if you have any questions.


