
If you’ve been using Linux for a decent amount of time, you might now realize that dotfiles on Linux are hidden files usually used for storing configuration for the system or software, e.g., “.bashrc“, “.zshrc”, “.vimrc“, “.git“, just to name a few.
There has been a classic problem with managing these dotfiles. For example, when setting up a new system, you either need to reconfigure your system and software or simply transfer the dotfiles from your existing system to the new one.
What if I told you that you already have two systems and want to replicate (or sync) their software settings in real time? Transferring dotfiles for each change is time-consuming. To save time, you can use a tool called Chezmoi, which promises to solve your dotfile problems.
Introduction to Chezmoi
The Chezmoi tool simplifies the management of your dotfiles across multiple systems. By configuring both systems with Chezmoi and integrating it with Git hosting services like GitHub, GitLab, or Bitbucket, you can sync your dotfiles across two or more systems with ease.
This way, you won’t have to manually copy-paste each dotfile modification to another system, and even if you don’t have another system to sync your dotfiles, you can use it to backup your system and software configuration files in case of system failure.
So, without wasting any more time, let’s see how you can install and set up your Linux system with Chezmoi, with a few command-line examples.
How to Install Chezmoi on Linux
As of now, Chezmoi is not added to the Linux repository, but its download page has a one-line curl command that I’ve also included below for you to quickly install it on your Linux system.
$ sh -c "$(curl -fsLS get.chezmoi.io)"Alternatively, if you are using an Ubuntu system that comes with Snap installed or if your system is installed and configured with HomeBrew, you can use any of the below commands to install it.
#For Snap
$ sudo snap install chezmoi --classic

#For HomeBrew
$ brew install chezmoi
Once the installation is finished, a “chezmoi” command becomes accessible from anywhere.
Now, to showcase how to use it to sync your dotfiles between two different Linux machines, I assume you are very new to this tool, and we will begin with your first system (let’s call it the “old system“), whose dotfiles you want to backup.
How to Configure Chezmoi on Your Old System
Once you have Chezmoi installed on your old system, you can begin following the steps below to set up and configure it with the GitHub hosting service and later use it to back up the dotfiles.
1. The first step you need to take is creating a new GitHub repository (though you can also use GitLab or Bitbucket), which will be used to store your dotfiles. I also suggest naming your repository either “.dotfiles” or “dotfiles” (I chose this).
2. The way you initialize Git in your project directory, you need to use the following command to create a new Git local repository at the path “~/.local/share/chezmoi“, where chezmoi stores its source state.
$ chezmoi initOutput:

3. Now you can begin adding your dotfiles to your Chezmoi directory. For the demonstration, I’ve added the “.bashrc” file, but feel free to add another single or multiple files at once.
$ chezmoi add ~/.bashrcOutput:

You’ve seen it right; a dotfile such as “.bashrc” will be renamed to the “dot_bashrc” file in the Chezmoi directory.
4. Before pushing all your dotfiles to GitHub, if you want to perform some changes to your dotfiles from the source state (from the “chezmoi” directory), you can use the following command:
~/.bashrc” file with your desired dotfile.$ chezmoi edit ~/.bashrcIt will open the “~/.bashrc” file from the “~/.local/share/chezmoi/dot_bashrc” in your existing editor set to the “$EDITOR” environment.
If you’ve previously modified the dotfile and want to see the difference between both changes, you can use the following command to see what new changes would be made:
$ chezmoi diff5. After making all the changes, you can apply them using the following command:
$ chezmoi -v applyOutput:

6. Move to your source (chezmoi) directory, initialize your GitHub repository with it (created on step one), and specify a main branch for it (if you’ve done these steps before, you can proceed to the next one).
#Move into the source directory.
$ chezmoi cd

#Initialize the GitHub repository in your source directory.
$ git remote add origin [email protected]:GITHUB_USERNAME/dotfiles.git

#Assigning a main branch to it.
$ git branch -M main
Output:

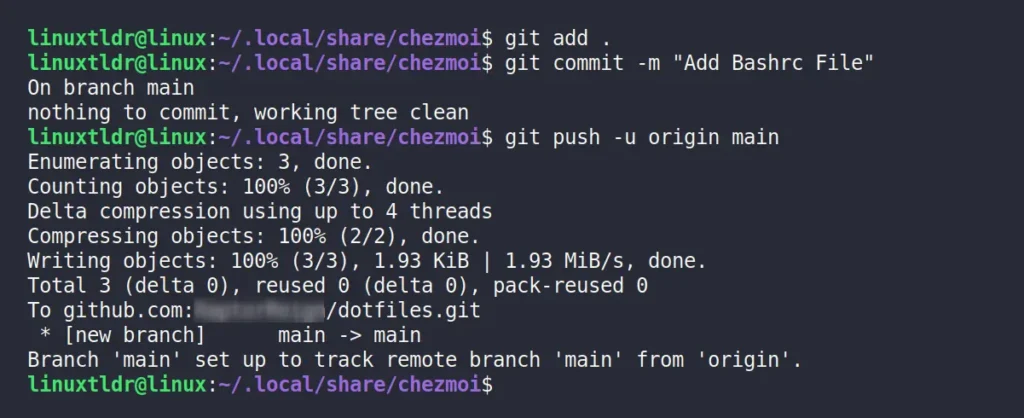
7. Finally, add the changes, commit it with a unique message, and push it to the GitHub repository.
If you are pushing for the first time to your GitHub repository and haven’t configured the Git command with your GitHub account, you might need to sign in for identification.
All you need to do is replace the values of the following command with your GitHub account information and execute it on your system.
$ git config --global user.email "[email protected]"
$ git config --global user.name "Your Name"
Afterward, copy the content of the “~/.ssh/id_rsa.pub” file (if the file does not exist, then create a new one using the “ssh-keygen” command) and paste it into the GitHub SSH Key section.
$ git add .
$ git commit -m "<Initial commit message>"
$ git push -u origin main
Output:
All the steps to back up the dotfiles from your old system to the GitHub repository are complete; now, you can transition to your secondary system, which we refer to as a “new system“.
How to Apply Chezmoi Changes to Your New System
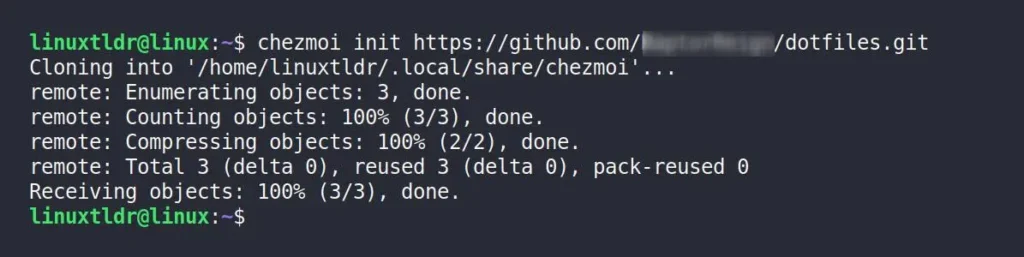
Your first step on your new system will be to install Chezmoi by following the steps mentioned in the installation section. Then, you can copy the URL of your GitHub dotfile repository and paste it below to pull all the dotfiles to your source (Chezmoi) directory.
$ chezmoi init https://github.com/GITHUB_USERNAME/dotfiles.gitOutput:
Once all the dotfiles are pulled to your source directory, you can apply them. But before that, if you want to see what changes they could make to your local dotfiles, you can use the “chezmoi diff” command. If you want to modify any dotfile before applying, you can use the “chezmoi edit filename” command.
If you are happy with the changes that chezmoi will make, then run:
$ chezmoi apply -vOutput:

That’s it; you’ve successfully applied the changes from your old system to your new system using Chezmoi.
Final Word
I hope you find this tool incredible, and before ending this article, I want to highlight that in your old system, you don’t need to perform the Git initialization step every time. Once you’ve followed all the steps mentioned in this article, next time, you just need to add your dotfile, apply the changes, and push the changes to your GitHub repository using the last step.
The same goes for the new system. Once you’ve added the GitHub repository to the new system, you simply need to apply any changes if you’re satisfied with them.
Lastly, if you have any questions or queries related to the article, then please let me know in the comment section.
Till then, peace!


Join The Conversation
Users are always welcome to leave comments about the articles, whether they are questions, comments, constructive criticism, old information, or notices of typos. Please keep in mind that all comments are moderated according to our comment policy.